It's getting colder out! We've had the wood stove going for at least half of October, mostly because it's so much easier to keep it going then to re-start it. So I'll split up one log into lots of pieces and keep is going with just a little wood over the day. Then stuff it full come sun-down.
Was thinking of making something for the doors when I found this: http://www.ehow.com/how_17253_make-draft-dodger.html
LOVE IT! And so easy from an old tie, our doors are not very high so I won't need any thing larger either. You can knit them or sew them larger as well. We'll be using ones by the garage & outside doors we don't use, as well as down to the basement.

Friday, November 4, 2011
Thursday, November 3, 2011
Greenhouse plans
When we first came to see the house and I spotted all the lovely old windows (that had been replaced on the house) still sitting in the barn, I got very excited. In fact we included them in the sales clause, that they were not allowed to get rid of them. This is why...
The plan is to make a recycled window greenhouse.
Making a green-house with plastic is a great utilitarian low-cost solution. Maybe it was growing up close to Allen Gardens, but I have always loved solariums, and greenhouses. So we're going to the second lowest cost solution, which is recycled windows.
You have to find old windows to do this, new windows have a UV ray protectant film on them, which is the opposite of what you want in a green house.
We're building ours on one side of the shop, for 2 reasons. The first being that the side that the shop is on provides very little light anyway. That side is mostly north (we're on an angle) so it's saving us putting windows where they wouldn't be much benefit anyway. The second is we have the option of heating the greenhouse with the shops woodstove.
I'm not sure when we are going to get the greenhouse built, I'll be very happy if we can get it done next year. It maybe another year before we actually consider heating it, but at least we have the option. I would love to be growing our own coffee, tea & bananas in the green house.
First things first, I'm going to need more windows.
This was a go-big or go-home sort of project. If you're doing a plastic green house you can get away with starting small & adding later, really easily actually. If we wanted to expand a glass greenhouse later we'd be taking down a whole wall. It's too small anyway, I laid out all our work-able windows on the grass (then stupidly left them alone for 20 minutes, the ducks/chickens/someone broken one) and measured out what we got.
8 x 7 and 2 walls 6 x 7.
Yeah, that isn't super small, and for lots of people that is definitely enough room; but I don't have space in the house to be starting plants. It's a problem every year! I take over an entire section of the house then we have cats pooing, dogs nosing, kids tipping dirt over and having mud-fights in the house. I want to be able to start an entire gardens worth of seeds (and I start most plants as seeds) in my little greenhouse, and eventually be able to over winter, or even raise tropical plants in there.
The site could me a little more ideal. It's right beside the barn too, so the greenhouse is going to miss the very last of the evening sun, but should get really strong early morning to early-evening in the summer.
So how big do we want it?
Well... as wide as the shop which is probably about 18' so it looks good, and about 10' wide. What we have is about 7' tall, which is perfect because you walk out a door from the shop down into the green house, and we need enough for head room (so we'll build up a little foundation then have the windows so the whole thing should be at least 8' high).
So, hubby has a mission! He's got to talk to some of this buddies in windows and see what we can get, otherwise the greenhouse is stalled indefinitely. Not only do we need several feet of more windows for the 3 sides, we need some for the roof as well! Really hoping to get my hands on some old sliding glass doors, that would be amazing!!
The plan is to make a recycled window greenhouse.
Making a green-house with plastic is a great utilitarian low-cost solution. Maybe it was growing up close to Allen Gardens, but I have always loved solariums, and greenhouses. So we're going to the second lowest cost solution, which is recycled windows.
You have to find old windows to do this, new windows have a UV ray protectant film on them, which is the opposite of what you want in a green house.
We're building ours on one side of the shop, for 2 reasons. The first being that the side that the shop is on provides very little light anyway. That side is mostly north (we're on an angle) so it's saving us putting windows where they wouldn't be much benefit anyway. The second is we have the option of heating the greenhouse with the shops woodstove.
I'm not sure when we are going to get the greenhouse built, I'll be very happy if we can get it done next year. It maybe another year before we actually consider heating it, but at least we have the option. I would love to be growing our own coffee, tea & bananas in the green house.
 |
| The "wall" closest to the camera is smaller because we need a door out of the green house |
This was a go-big or go-home sort of project. If you're doing a plastic green house you can get away with starting small & adding later, really easily actually. If we wanted to expand a glass greenhouse later we'd be taking down a whole wall. It's too small anyway, I laid out all our work-able windows on the grass (then stupidly left them alone for 20 minutes, the ducks/chickens/someone broken one) and measured out what we got.
8 x 7 and 2 walls 6 x 7.
Yeah, that isn't super small, and for lots of people that is definitely enough room; but I don't have space in the house to be starting plants. It's a problem every year! I take over an entire section of the house then we have cats pooing, dogs nosing, kids tipping dirt over and having mud-fights in the house. I want to be able to start an entire gardens worth of seeds (and I start most plants as seeds) in my little greenhouse, and eventually be able to over winter, or even raise tropical plants in there.
The site could me a little more ideal. It's right beside the barn too, so the greenhouse is going to miss the very last of the evening sun, but should get really strong early morning to early-evening in the summer.
So how big do we want it?
Well... as wide as the shop which is probably about 18' so it looks good, and about 10' wide. What we have is about 7' tall, which is perfect because you walk out a door from the shop down into the green house, and we need enough for head room (so we'll build up a little foundation then have the windows so the whole thing should be at least 8' high).
So, hubby has a mission! He's got to talk to some of this buddies in windows and see what we can get, otherwise the greenhouse is stalled indefinitely. Not only do we need several feet of more windows for the 3 sides, we need some for the roof as well! Really hoping to get my hands on some old sliding glass doors, that would be amazing!!
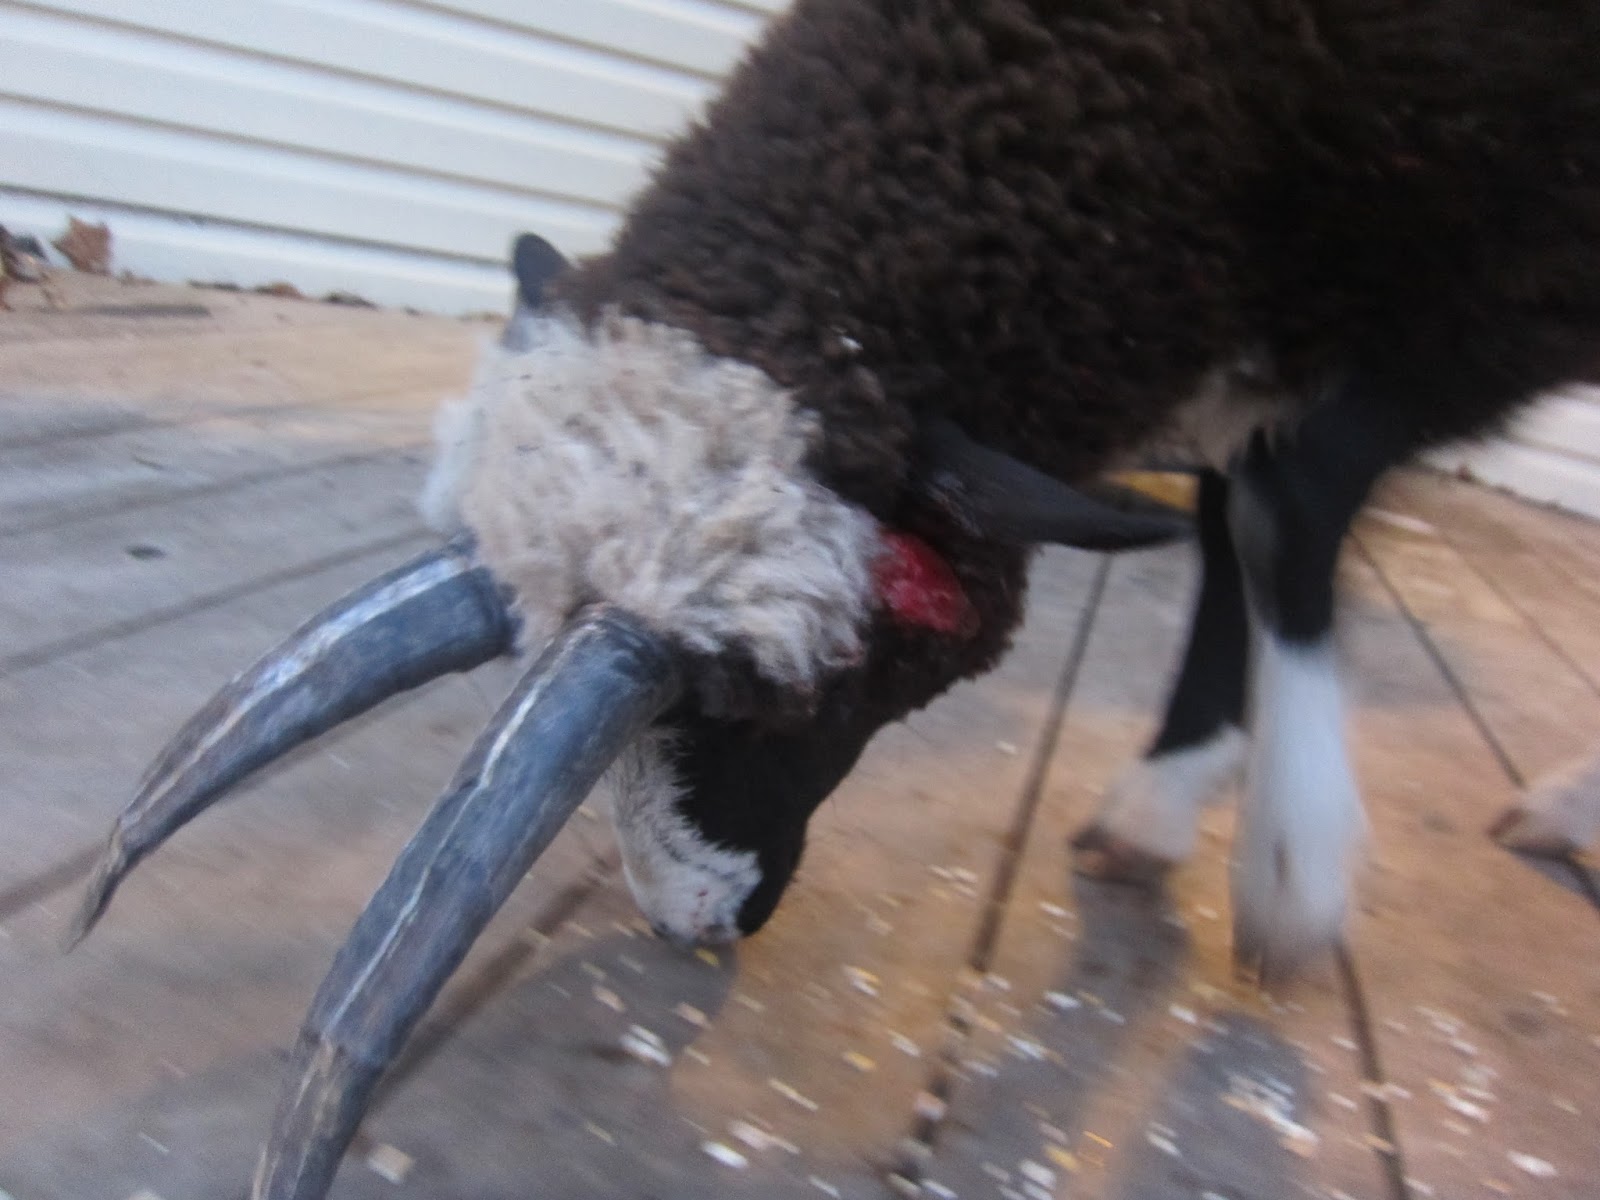
What happened to Billy!?!?
Well... I don't know.
The goats & Billy frequently duck under the back fence (naughty creatures!) to come run around and eat all the grass on the lawn. We just let it go because we're going to fix the fence next year anyway, they don't wander off anywhere (no where for them to go) and they come when you call. Plus, we don't have to cut the lawn...
I was in & out of the farm yesterday with the meat birds, and when I went out to put the goats/Billy away for the night, Harry & Diego were already in their stall but Billy was nowhere to be seen. So I called him, and hear him come baaing from out in the garden. So he comes trotting in, at which point I notice he's missing part of his face!!
So it looks like his left horn that normally points down has been ripped right off. I have NO Idea how this happened, or where it happened. He's also got a little cut on his forehead. The only guess I have is that he got wrapped up in the fence somewhere and pulled it off trying to get out, but that is only a guess. I never heard him bleat for help, or noticed he was missing until I called them in.
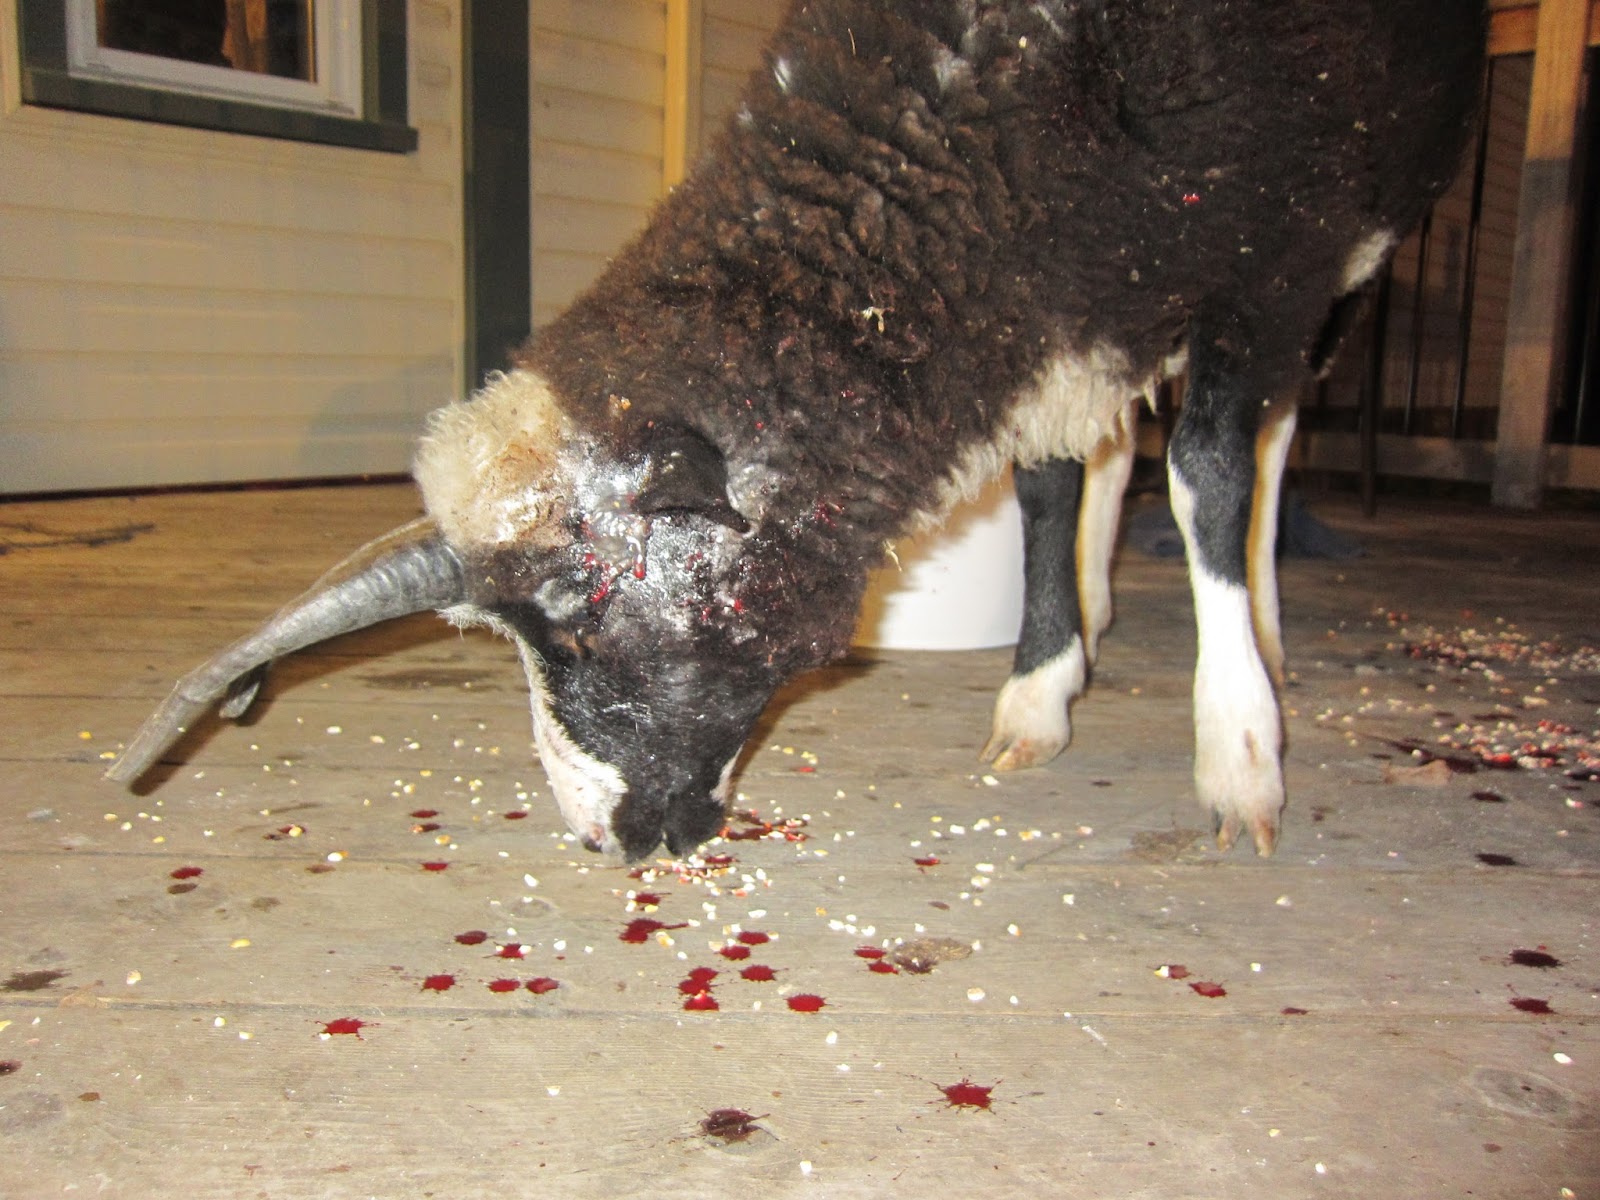
The stump wasn't bleeding when I first saw him, but my efforts to "clean it up" lead to him spurting all over the back deck. All the while nosing around looking for grain... So I applied pressure until it stopped, then ran in & grabbed the corn starch and it did stop. Then it was iodine to cover the whole thing. At this point I had to wait until hubby got home to hold him (thankfully he was already close!). Hubs held billy, I placed an old towel over his eye & applied the liquid bandage. So now he's sparkley...
 I kept him in Meg's stall over night so the goats wouldn't bump him, but let them out in the back-section of the barn so they could see each other. (Horses were outside).
He's outside running around with the crew today, in fact I just caught him on the wrong side of the fence! Looks like it might have been bleeding a little bit, but over-all looks okay...
What a day!
We were just going to leave things alone with the fence, but I'm going to investigate if we have some more tape-clips for the t-posts (and I'm pretty sure we do) and we'll run another string this weekend so they can't duck under the fence any more. There is a chance he did it somewhere else on the farm too, I'm just hoping this never happens again!
 |
| What he looked like last night |
The goats & Billy frequently duck under the back fence (naughty creatures!) to come run around and eat all the grass on the lawn. We just let it go because we're going to fix the fence next year anyway, they don't wander off anywhere (no where for them to go) and they come when you call. Plus, we don't have to cut the lawn...
I was in & out of the farm yesterday with the meat birds, and when I went out to put the goats/Billy away for the night, Harry & Diego were already in their stall but Billy was nowhere to be seen. So I called him, and hear him come baaing from out in the garden. So he comes trotting in, at which point I notice he's missing part of his face!!
 |
| This is what Billy normally looks like |
 |
| The Scene! |
 I kept him in Meg's stall over night so the goats wouldn't bump him, but let them out in the back-section of the barn so they could see each other. (Horses were outside).
 He's outside running around with the crew today, in fact I just caught him on the wrong side of the fence! Looks like it might have been bleeding a little bit, but over-all looks okay...
What a day!
We were just going to leave things alone with the fence, but I'm going to investigate if we have some more tape-clips for the t-posts (and I'm pretty sure we do) and we'll run another string this weekend so they can't duck under the fence any more. There is a chance he did it somewhere else on the farm too, I'm just hoping this never happens again!
Wednesday, November 2, 2011
Chickens
 |
| First Arrived in July |
 |
| Outside for the first time |
 |
| Enjoying the paddock |
 |
| Enjoying the maggots |
 |
| Coming in for dinner. |
 |
| Their last day here |
 |
| Crates from the processor ready to go |
 |
| Off go the first group of 15 |
 |
| And then they came back. Very impressed with the processor! |
 |
| Got my weigh station all set up, had to work quick to get them all into the freezer |
 |
| Out biggest chicken!! We had a 2.5Kg for dinner tonight and put half away as leftovers... |
 |
| Handsome looking group! |
 |
| A freezer full of goodness! |
Also it was flippin' delicious!! A little more texture then we're used to, but a downright yummy bird! The dark meat, something I normally hate because of the greasy taste, was just beautiful.
Half way through the meal hubs has to ask "You do realize this thing was running around on the farm yesterday right?" to which my reply was "You do realize it was flapping and squawking this morning, right?".
They arrived as those tiny fuzz balls and 3 months later they ended as these behemoths on our dinner table. It was a wonderful experience (if not, a lot of work) and like our 3 year old, I can't wait for the arrival of more chicks early spring.
I think I'm going to like thing country living thing... The food is definitely better.
Tuesday, November 1, 2011
Bio Security
Now, I've made it no secret to anyone
I've talked to in the last 4 months how ridiculous and unfair the
quota rules are. Before I start on another rant about that, here is
something the OMFARA is getting really right.
You
can get a biosecurity booklet with all their info at:
www.agbiosecurity.ca or
www.healthybirds.ca.
 |
| I tried printing & posting my own sign from the site, it lasted one rainstorm despite the protective sleeve |
Most
of the information is already available on heathybirds.ca (which is
really worth checking out of general bird health information, even if
you don't live in Ontario). The booklet is a nice reference, although I'm not sure how long the "weatherproof" sign is going to last.
Biosecurity
is really important to the backyard flock owner for a few reasons,
not the least of which are
- Even though BigAg productions pose a far greater threat of producing and spreading big scary anti-biotic resistant diseases, we don't want to be passing around avian flu or west nile either, and those are ones small flock keepers are good at spreading around.
- You don't want to your birds getting sick & loosing your time and money investment into them
- It's the law. As I mentioned before, it's illegal to free-range in Ontario because you need to limit access of wild birds (and other animals) to your flock. (Of course there are ways to limit wild birds when your birds are ranging)
Most of the bio-security stuff you're probably already adhering to because it's common sense. Other things are as simple as having a hand-sanitizer bottle in your
chicken coop (you can pick up a pretty big bottle at the dollar
store). The log book is just in case there is an outbreak, so they can
track back who has come to visit, and you only need people who have
chickens (or who have recently been around chickens) to sign it.
Keeping
your coop, waterers, feeders, and bedding clean will keep your birds
healthy and make your job a whole lot more enjoyable. I also really believe in the principal of making the inspectors (should they ever show up) happy by showing we're making the effort and they are going to leave us alone.
Come Tweet with us!
http://www.cbc.ca/news/business/smallbusiness/story/2011/10/14/f-twitter-farmers-agriculture-social-media.html
I've used twitter before, and honestly didn't have much use for it. Now that I have something that I'm really passionate about, I've found it's an amazing way to connect to tons of people with the same passions.
It's really neat to read other farmers talking about the yields they got off their fields, or passing around the latest article from the globe. I'm still new to the twitter-verse but I'm hoping to find more & more local people I can bother with silly questions when I need help.
And as Robert A. Heinlein said "I never learned from a man who agreed with me"
#OntAg will get you started!
Monday, October 31, 2011
Cook: Chicken
In honor of our chickens, I'd like to re-blog:
Roast Chicken
This is a one-pot chicken I've been making for years, trust me on the butter. It's absolutely delicious, you get the best caramalized chicken butter vegetables! I pick up the chicken when they go on sale for $5 each at the store, and keep them in the freezer. Hopefully we'll be using our own birds very soon!
What you need:
Whole Chicken
Veggies from the Fridge
Butter
Chicken Herbs (Thyme, Salt, Pepper, etc.)
I like to use potatoes, carrots, onions & garlic. You can get more creative though! Take whatever is in the fridge, peel and cut into 2"+ pieces. You can cook your chicken from fresh or frozen. I like to mix my herbs into a softened butter. 1/2 a cup or 1 stick is more then enough for a chicken. Smother the chicken with your butter. If I've got extra time I'll peel the chicken skin back from the breast meat and stuff underneath as well.
I use an oven roaster with the lid on, and turn the chicken breast meat down. Once you're nearing done you flip the bird over and remove the cover to brown the skin on the top. In the oven at 425F between 1 hour and 2 hours depending on the size of your bird. (If you start your chicken 3 hours before dinner it will take 1 hour, if you start your bird 1 hours before dinner it will take 2 hours...). Sit back and watch your kids eat their vegetables. Save the chicken bones for stock!
Chicken Stock
Store bought is not even the same animal as homemade chicken stock, it's unbelievably different. I save all our carcasses from roast chickens, wrapped in plastic in the freezer, as well as bits of raw chicken (like wing tips), until I have enough to make stock. I'll then use the stock in dishes, or as a base for some delicious chicken noodle soup.
What you need:
Whole chicken carcass or lots of bones & bits
Veggies from the Fridge
Olive oil (or butter)
You need a stock pot for this one, a nice big deep pot, or you'll be making incredibly tiny amounts of stock.
Create a mirepoix by chopping celery, carrots and onions and sautéing them in the pan with olive oil or butter. If you don't have those (and I usually don't have celery) you can use anything similar that you like. Add frozen chicken bits and bones. Add just enough water to cover the entire chicken (or if you've added way too much chicken, just fill the pot up). Bring the pot to a boil for a few minutes, then reduce to a low simmer & cover.
Using an older, whole chicken will give you the best results. I find you get pretty mediocre stock if you only have bones, adding some raw chicken in really makes a nice stock. If you want you can add 2tbs white vinegar/gallon of water to increase the amount of calcium that comes out of the bones & into your stock.
Once your stock is simmering you've got to leave it for a few hours. You want it to be at the point where the chicken is falling right off the bones. Taste test occasionally to make sure it's at the correct strength. Too weak, simmer longer, too strong dilute or finish the stock & use less when your cooking.
When the stock is finish strain it into another pot and leave it aside to cool. I also allow what is left in the strainer to cool off (usually dripping over the pot, with something covering) then pick through for the big chunks of meat. You've got to be really careful for the little bones. You can either use this meat in chicken soup or if they are being good, and sitting beside you licking their lips, I'm sure the dogs wouldn't mind either.
To store I put my stock into mason jars and freeze. If I'm going to use it right away I'll put it in the fridge. The fat all rises to the top which will seal the stock inside, but I like to use it fairly quickly once it's finished. You can either use the fat for cooking, or throw it away (or again, the dogs).
You can definitely freeze in glass jars, just don't fill them all the way to the stop, and wait until the contents are frozen to tighten the lid. Of course, you can also can your stock if you've got a pressure cooker!
(This also works great for turkey, I have 3 jars of lovely turkey stock in my freezer after thanksgiving!)
Some of my other favourite chicken recipes:
Buffalo Chicken Wing Salad with Blue Cheese
Chicken Parm
Versatile Blogger
Thanks Ashley!
Ashley does a great blog about her beautiful old farm house at firsthomedreams.blogspot.com as well as swampdogs.blogspot.com about her equally beautiful (although special) golden.
The versatile blogger award is for new blogs so we can share traffic and direct your readers to other blogs they might love.
Sunday, October 30, 2011
Are you sure those are meat chickens?
If I had a dollar for everyone person
that had asked that, well, maybe that would be the best way to make money farming.
Our birds grew more slowly then your typical meat birds. It wasn't a mix up at the hatchery as we first suspected, although it's possible we weren't feeding them enough around the 4 months mark (my bad!). Quite simply the reason our meat birds don't look like meat birds, is because we let them live.
 |
| Out scrounging around |
They had a chance to run around, enjoy the sunshine, scratch in the dirt, get into the cow poo, and choose whether or not they wanted to interact with any of the other chickens at any given moment. In return I have a whole lot of chicken poo to clean up around the farm when they are gone, but the grass is richer for it. We lost none to heart-attacks and broken legs despite them getting far older then they are supposed to. They greatly reduced the fly population around the farm, and provided tons of soil aeration to a few spots that really needed it. As well as entertainment for the kids.
For next year we are going to confine them to certain areas, probably with electric netting, just to keep the poo off the lawn. We also have to do this so that we can get a better feed conversion rate, unless everyone wants to pay $10/Kg. I hope we never have to go to an indoor system, to me this seems a far fairer way to raise chickens.
|
| Following me into the barn for dinner |
Their date is set for Wednesday. We're all very excited and should be enjoying our first roast chicken from the farm within just a few days. We've already had a ton of friends and family asking for chickens, in fact I doubt we're going to have enough as everyone would like. I certainly hope they all enjoy them too.
Quite honestly I think I'm going to miss those feathery little white bowling balls running all over the place. When they weren't getting directly in my way, or the cockerels trying to bite at my legs, they were quite a nice animal to have around. I'm looking forward to next April when we'll have a fresh crop of little yellow fuzzy bums.
Pedicure Time!
 |
| How Megs says Thank you. |


Allie K from BareNecessities did an amazing job! I was a little wary of using a 'natural' trimmer, but my horses never wear shoes anyway, so really all the difference is that she didn't trim off the edges of their toes with the clippers (they're like big nail clippers). Instead she spent an hour & a half shaving away with the file. Something my back would never stand up for!
Made great angles on their feet, they do need another go in 6 weeks since it took so long to get someone over here. After another trim they'll be looking show-ready! (Not that we have plans to go anywhere).
 |
| C'mon Maddie, Share! |
Anyway, Maddie was amazing, I barely had to hold him and other then a little "Oh, what's that?" when Allie moved the stand, he was very calm and happy to get his toes done! But some horses are like that, Meg likes male vets, I guess Maddie likes female farriers.
 |
| He's got such pretty spotty toes! |
So, time for some trail rides already!! Too bad we missed the nice weather, but riding in the fall is nice because you don't boil.
Subscribe to:
Posts (Atom)